Showing posts with label how-to. Show all posts

Sunday, October 25, 2009

What (Not) To Do With Your Camera

Christmas-time means a slew of shiny new cameras in the hands of consumers everywhere. At this point in the year, the end of October, I had hoped a lot of those budding shutterbugs would have gotten a firmer grasp on how to handle their new weapons... but alas, I'm still seeing some basic mistakes in technique that people make that is stopping them from getting the most out of their cameras.

1) The camera is not a dirty dishrag. You don't need to hold it arms length away from you. This is not a middle school dance with your camera as your date. I had someone once come to me complaining that they just couldn't get the same sharp images with their point and shot that I was getting with my DSLR. I had them take a few photos so I could see how they went about it, and I found they were holding the camera way out in front of them. Now part of this I think is because of the design of a lot of new digital cameras that have live LCD viwers on the back instead of optical view finders (i.e. looking through an actual hole in the camera like you had to before digital came along). But I would highly, HIGHLY suggest to hold tight onto the camera. Place your feet shoulders width apart and hug the camera as tight to your chest as you can to take as steady a shot as you can. Another option to increase stability are mini tripods - Gorilla Pods are one brand I know of that are for use with light weight P&S camera's, the idea behind them being that the legs can wrap around surfaces like fences or trees to open up more photo possibility without needing a full size tripod.
Other variations I see on this are people standing holding the camera with just one hand... use both to be more stable.


For the record I have not used one of these, but I would NOT recommend using it with anything heavier than a point and shoot.

2) Forgo flash, embrace natural light. Today I went to a beautiful park, Fort Williams, and saw a young woman with an entry level DSLR taking photos of the lovely beach scene in front of us. Nothing wrong with that... till I noticed that her on-camera flash was popped up and firing. There are some instances where flash is inevitable, but don't waste your batteries using the flash on landscapes. You should also turn it off if you are in a large auditorium and far away from the stage, because the light simply won't travel far enough to illuminate what you want; in fact the flash firing can trick your camera into using a FASTER shutter speed which in turn may make your image darker than you wanted. You'll also find your photos to be more pleasing to the eye when they are using ambient (natural/available) light versus the camera's flash.

3) Auto Mode. If you have a DSLR there is zero excuse to shoot in auto mode unless you are shooting something like sports and you haven't had a lot of experience and NEED to nail the shots. But if you can control your shutter speed, aperture and ISO - do it. This might be the biggest issue I see with photographers images... a simple lack of control. I was intimidated for a long time with the controls of my camera till I really forced myself to learn them, and now I can't imagine shooting in Auto Mode. camerapedia.org is a great resource for information on cameras, including explanations of shutter speed, aperture and ISO. I would be unable to shoot the majority of images that I now shoot if I were still using Auto settings.


Photograph from CLF on flickr creative commons

4) Distracting your viewer with large watermarks or borders. There are some photos that look great with a border and some watermarks that are artistic and lovely. But I see so many photos overtaken with giant, thick black borders that just aren't necessary and really detract from the image as a whole. In a real life situation I love seeing photos with matted borders, but online where images are already getting squished small enough to fit my screen comfortably, I don't want to see them made even smaller because a border is taking up 1/3 of the area.


But really if there is one thing to do, get off auto mode. You'll be amazed at the results!

Next up I'm hoping to do a side-by-side comparison of aperture settings to better demonstrate what the heck they are. I figure I yell enough about setting everything manually I might as well explain the settings a bit more ;)

Wednesday, April 1, 2009

Keeping Technologically Sane: After the Shoot

When I first started taking photographs, I would just dump the photos onto my computer (an old dell desktop at the time), delete any that I didn't like, and edit the other using ms paint. no joke. I could actually take out blemishes using copy/paste in ms paint.

Years later I've finally come up with a work flow that keeps me sane and a saving/backing up system that keeps my work safe. Right now I'm going to go over how I keep my photos organized so I can easily find them.

First step - open up Lightroom and download my photos to my computer using their "import" function. I have it set up so that when I download my memory card to my laptop, it's saving not just on my laptops hard drive but also backing up simultaneously on my external hard drive (a Free Agent 250gb drive). I used to just dump everything into folders and not really organize... BIG mistake. Now I have it set up into trees. For example, if I'm looking for a photo that I shot a guy named ben back in January to email to someone, I open:

Photography > Fashion > 2009 1.8 Ben > watermarked and webready

and there they are! My photos are organized by type (Nature, Art Portraits, Commercial, Events, Fashion, Glamour and Nudes, and Headshots) then further broken down by the date along with the subject name or a brief descriptor. Inside each of those is a folder for RAW files, a folder for photoshop files, another for high resolution jpegs and a final one for webready images. I keep the original numbers attached to all the files so that they are easily referenced. So if for instance I upload the photo of Ben to dA, and someone makes a suggestion on ways to improve the retouching, I can easily consult the webready folder to figure out the file number. Then, knowing that it's file xyz2 I can go to my photoshop folder and look for file xyz2 to edit. This has saved me SO many headaches you can't even imagine!

What's great about Adobe Lightroom though is that it gives me even more power over how I file my images. When I import from my memory card to Lightroom I have the option to assign every photo a set of keywords. I have roughly 3000 photos cataloged on Lightroom, and a good chunk of those have keywords tagging them.
This means that if I decide I want to show someone all the concerts I've ever shot, I can type in "concerts" into the search field and every photo tagged with that word will appear.

I generally tag my photos with the date, name of the model, place it was shot (inside/outside, studio, location, a town or city name and sometimes the state if I feel like it, though that's not really necessary), and descriptors (female, blonde, blue eyes, tall, fair skin, black dress, high heels) and some words to pinpoint what kind of shoot it was - fashion, event, headshot, etc.

I also make sure to back up my work as I go. Every time I'm done with a project I back up the photos and other files onto my external drive.

Overall I've found that taking a few extra minutes to organize your photos and back them up in multiple places as you bring them onto your computer can save a lot of time and hassle later on, and I highly recommend everyone to come up with some system to keep track of their own - feel free to borrow mine :)


Bookmark and Share

Monday, March 23, 2009

Tip o' the Day! Making Photos Look Good Online

There are some places online where photos are pretty much doomed, most of those places being social networking sites. Myspace will resize photos, and facebook is even worse - photos that looked fine on your computer will appear desaturated, pixelated, and just generally crappy once they're uploaded to a facebook gallery.

The most annoying thing though is when sites that are SUPPOSED to be for showing photos, seem to mess them up as well. To keep your photos looking great, make sure you are resizing them properly, using a moderate amount of sharpening if needed, and converting them to the correct color profile.

In Photoshop when you resize an image (Image > Image Size or ctrl+alt+I on a pc) you will be presented with a dialogue box. At the bottom of the box you'll see a small drop down menu with several options; most of the time this is set to "Bicubic Smoother (Best for Enlargements)" but since we aren't enlarging we want to choose a different setting. Click the menu and choose "Bicubic Sharper (Best for Reductions)".

When making an image smaller, it tends to get softer and lose it's crispness, so this helps preserve some of that.

Even using Bicubic Sharper you may still need to sharpen your image more. Duplicate the image, and on the top layer use Filter > Sharpen > Smart Sharpen or Unsharp Mask. I prefer Smart Sharpen most of the time because to me, Unsharp mask just brings out black edges too much and I don't like the look; you might like Unsharp mask the best, it's really personal preference or what your client wants.
After you apply your filter, you can adjust the opacity of your top layer to achieve the amount of sharpness you want. You can also use masks on the top layer to control which areas get sharpened (when I retouch portraits, I mask out the sharpness on skin, so that just the eyes and hair gets sharpened).

Now you're ready to convert to the correct color profile for the web. Go to Edit > Convert to Profile and choose sRGB as your destination space. This will keep your colors retained on your image, so that they won't get all wacky once you upload them.

Now you're ready to save as a high quality .jpg and upload to the web!


Bookmark and Share

Sunday, March 15, 2009

Tip of the Day: Concerts

Since my boyfriend Dylan regularly puts on shows here at USM I find myself a lot of times tagging along with my camera. I went from never shooting concerts to feeling pretty confident doing so, so I wanted to share a small tip I've learned from the past year.


Don't forget about the audience! I've gotten some really nice shots from turning around and ignoring the band for a few minutes to get some shots of the crowd. Whether it's people at the show interacting with each other or catching another photographer mid-shot, you can get some really nice photos if you switch your area of focus for awhile.


Bookmark and Share

Saturday, March 14, 2009

retake!

Sometimes when I learn a new post-processing technique I like to go back to previous works and redo them.


emily
http://www.modelmayhem.com/1047156


Basically if you ever are converting to black and white - PLEASE don't just hit "desaturate"! It may look fine but it most likely can be made better by using the channel mixer or making a few layers with different contrasts. The image above was converted to black and white by making a low contrast layer on top of a high contrast layer and changing the blending modes and opacity till I reached what I wanted. Experimentation is key :)


Taking my pentax and a few rolls of film to Boston tomorrow :D Can't wait to share the results!

Thursday, January 29, 2009

A simple check-list to get you on your way to shooting models.

1. Practice with your camera on other things till you know it back to front.

2. Look at tons of photographs and figure out what you like and what you'd like to make. Talk to photographers whose work you admire, read tutorials, be a sponge and absorb as much as you can.

3. Find a simple model release - even if you're shooting your best friend in the whole world you'll need one and it can save you a lot of heartache in the end if you both agree IN WRITING as to what can be done with the photos. Be sure to show this release to your model before the shoot.

4. Shoot outdoors with a friend. Natural outdoor lighting is great to work in if you hit the golden hours (two hours before and right after sunrise, and two hours before sunset right up till sunset - or some approximation of those times, it depends on where you live, the time of year, and the weather).

5. Look up tutorials on how to retouch portraits, and try a bunch out to find a method that works best for you.

6. Develop a logical work flow and filing system, and always back-up your photos in two places.

7. Be timely about getting photographs back to your models. Nothing sucks more than collaborating on a project only to never get photos back. It's a bad habit to get into, and eventually it can ruin your reputation and make models not want to work with you.

8. Repeat steps 1-7 several times. My first seven shoots, which took place over the course of nearly a year, (not including all the times I took self-portraits) were of friends in a no-pressure situation. Four of them took place outside or indoors near windows to use natural light. Practice with friends till you feel good giving direction, experiment indoors with various lighting, and eventually you'll find your skill level, knowledge, and confidence photographing people will increase.


And don't forget the most important step of all... have fun! :)

Sunday, December 21, 2008

A Working Studio For Less $$$

So you've been taking photos outdoors or near windows to make use of natural available light. But now you're wanting to explore other kinds of portraits with backdrops and controllable lighting - after all, it's not always sunny or nice out!

The problem is that, like most photography equipment, back drops, stands, and lights are very expensive, and can take up a lot of space. If you're like me with only a dorm room to work in most of the time, space is a luxury.

These two factors combined are enough to make a person just give up entirely, but wait! There are a few great ways to make your own studio gear on a budget.

Lighting is a doozy - it's expensive and it takes up a lot of room. A "standard" softbox can run you anywhere from $60 to over $150. I've seen them range to $200 all the way up to over $5k!
Then you need a good power source, and a place to store it when you aren't using it. All in all for a student or anyone without a dedicated studio space, having full on pro lighting equipment can be a huge headache and just not a workable idea.

The wonderful thing is that you can still get great lighting that is much lighter, portable, and best of all CHEAP! Same for backdrops.


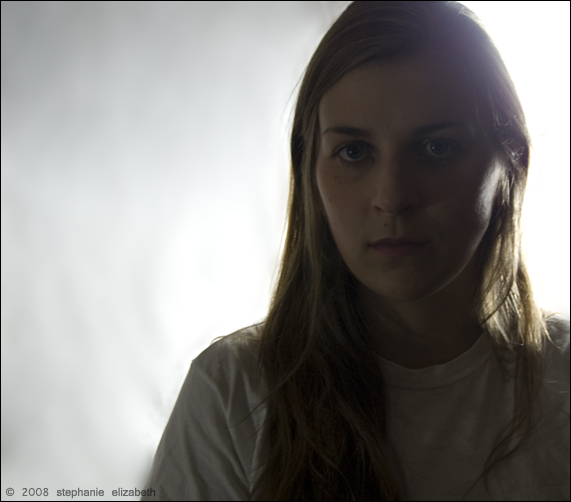
The above was taken using just one small clip desk light placed behind the subject, , the kind that you might find at wal*mart. There was also normal light from the ceiling fixture lighting the subjects front. When you shoot using normal indoor lights you generally will need to tweak things in photoshop to get rid of the orange tone that the lights give off.


This photo was taken using just two clip lights from walmart that cost $6 each. I used energy saving lightbulbs in them - they last for a long time, don't heat up, and give off a pretty clean (non-orange) light compared to normal bulbs. I clipped them to a chair and a bureau to position them and had them plugged into normal outlets. The background is a blank off-white wall.


That photo was taken using one clip light, and a white blanket as a background (photoshop was used to make the background smoother). Blankets and thick or doubled up sheets can be good background if you have no blank walls, but if they wrinkle they can look very tacky, so be careful and iron them beforehand if at all possible.


For more powerful lights you can get floodlights from a hardware store, and set them far back from the subject or hang something in front (not on or over, always be careful of fire hazards) of it to diffuse it. The good thing about floodlights is that you can get them for cheaper than 'real' lights, and they can take a bit more of a beating if you have to move them around a lot or store them. You can also use white pieces of foam core board or silver baking sheets as reflectors to bounce light onto your subject.


With back drops I would suggest trying to get a real back drop if you can... it will be a lot easier to take full length photos, as regular sheets won't be long enough. I found a used backdrop with a 10x20 foot black piece of muslin on craigslist for $100 - to put this in perspective, the cloth alone can retail for about $75, and the support system can sell for $200. I've also bought my camera for hundreds less than I would have normally paid, as well as a telephoto lens that I didn't think I could ever get. Craigslist is a great place to get cheap equipment if you know how to look for deals, what questions to ask, and how to avoid being scammed or taken advantage of. Next time I'll go over ways to get the most out of craigslist to expand your collection of camera gear.